A Guide to Automating & Scraping the Web with JavaScript (Chrome + Puppeteer + Node JS)
In this tutorial you’ll learn how to automate and scrape the web with JavaScript. To do this, we’ll use Puppeteer. Puppeteer is a Node library API that allows us to control headless Chrome. Headless Chrome is a way to run the Chrome Browser without actually running Chrome.
If none of that makes any sense, all you really need to know is that we’ll be writing JavaScript code that will automate Google Chrome.
Before Starting
Before starting you’ll need to have Node 8+ installed on your computer. You can install it here. Make sure to choose the “Current” version as it is 8+.
If you’ve never worked with Node before and want to learn, check out: Learn Node JS — The 3 Best Online Node JS Courses.
Once you have Node installed, create a new project folder and install Puppeteer. Puppeteer comes with a recent version of Chromium that is guaranteed to work with the API:
npm install --save puppeteerExample #1 — Taking a Screenshot
Once you have Puppeteer installed, we’re going to walk through a simple example first. This example is straight from the Puppeteer documentation (with minor changes). The code we’ll walkthrough will take a screenshot of any website you tell it to.
To start out, create a file named test.js and copy in the below code:
const puppeteer = require('puppeteer');
async function getPic() {
const browser = await puppeteer.launch();
const page = await browser.newPage();
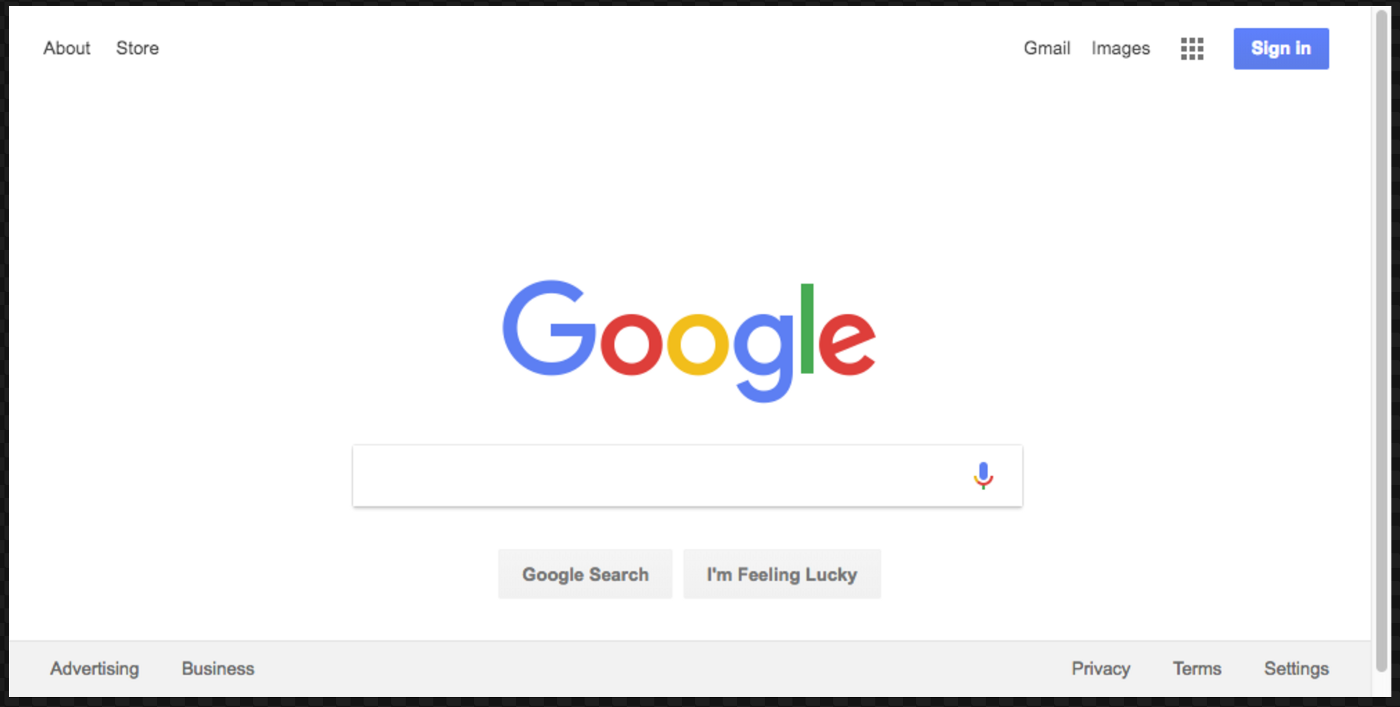
await page.goto('https://google.com');
await page.screenshot({path: 'google.png'});
await browser.close();
}
getPic();Let’s walk through this example line by line.
- Line 1: We require our Puppeteer dependency that we installed earlier
- Line 3–10: This is our main function
getPic(). This function will hold all of our automation code. - Line 12: On line 12 we are invoking our
getPic()function. (Running the function).
Something important to note is that our getPic() function is an async function and makes use of the new ES 2017 async/await features. Because this function is asynchronous, when it is called it returns a Promise. When the async function finally returns a value, the Promise will resolve (or Reject if there is an error).
Since we’re using an async function, we can use the await expression which will pause the function execution and wait for the Promise to resolve before moving on. It’s okay if none of this makes sense right now. It will become clearer as we continue with the tutorial.
Now that we’ve outlined our main function, lets dive into its inner workings:
- Line 4:
const browser = await puppeteer.launch();This is where we actually launch puppeteer. We’re essentially launching an instance of Chrome and setting it equal to our newly created browser variable. Because we’ve also used the await keyword, the function will pause here until our Promise resolves (until we either successfully created our instance of Chrome, or errored out)
- Line 5:
const page = await browser.newPage();Here we create a new page in our automated browser. We wait for the new page to open and save it to our page variable.
- Line 6:
await page.goto('https://google.com');Using our page that we created in the last line of code, we can now tell our page to navigate to a URL. In this example, we’re navigating to google. Our code will pause until the page has loaded.
- Line 7:
await page.screenshot({path: 'google.png'});Now we’re telling Puppeteer to to take a screenshot of the current page. The screenshot() method takes an object as a parameter which is where we can customize the save location of our .png screenshot. Again, we’ve used the await keyword, so our code pauses while the action occurs.
- Line 9:
await browser.close();Finally, we have reached the end of the getPic() function and we close down our browser.
Running the Example
You can run the sample code above with Node:
node test.jsAnd here’s the resulting screenshot:
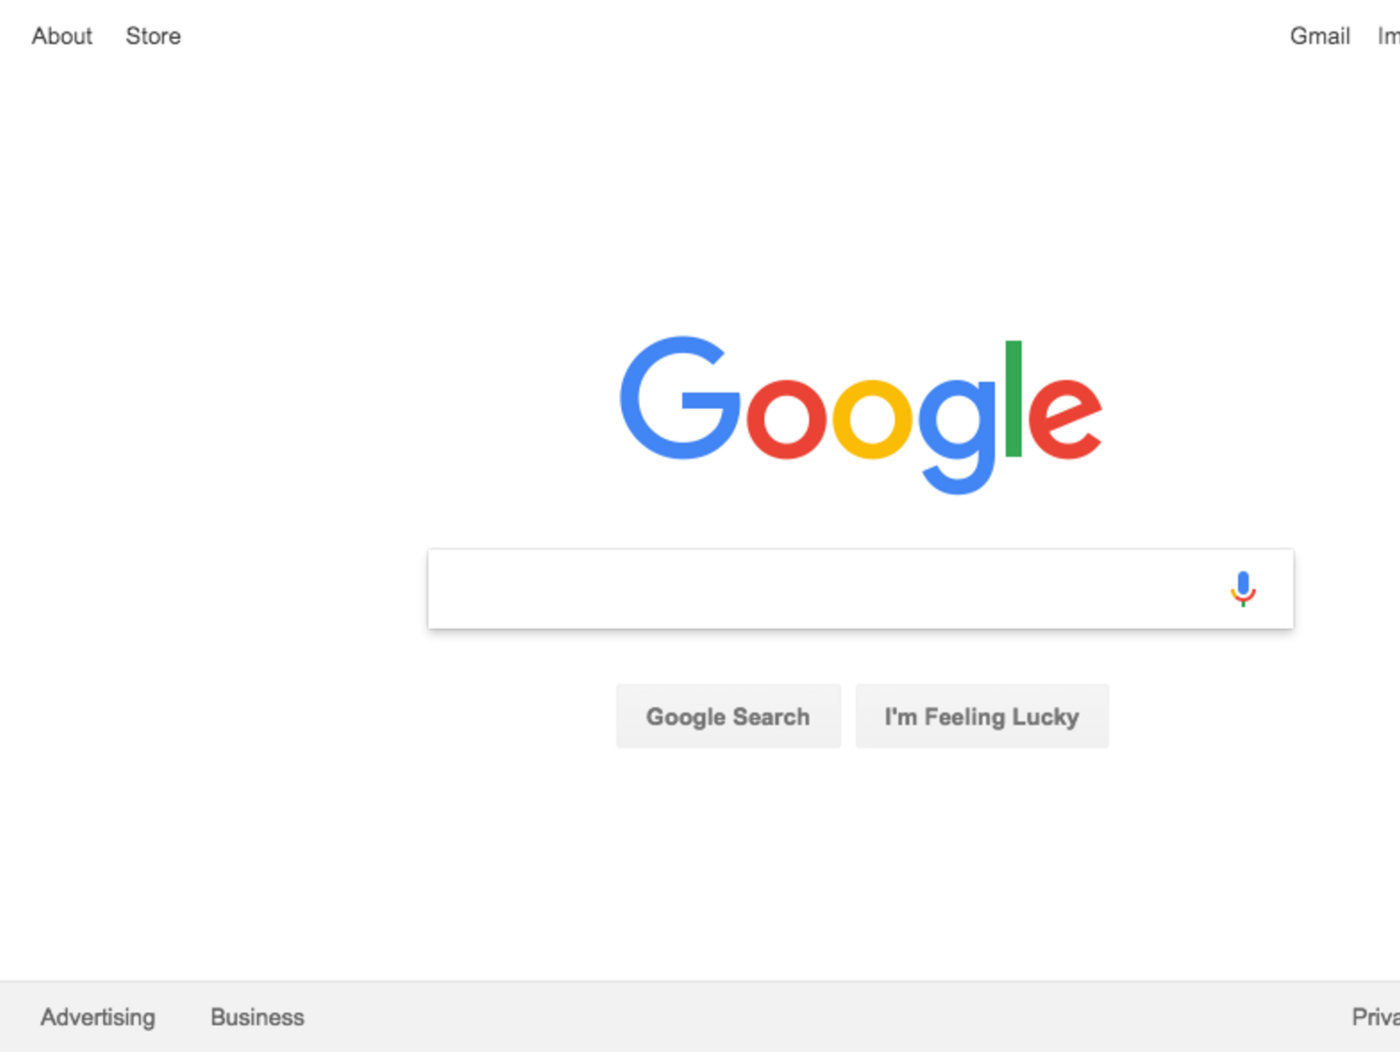
Awesome! For added fun (and easier debugging) we can run our code in a non-headless manner.
What exactly does this mean? Try it out for yourself and see. Change line 4 of your code from this:
const browser = await puppeteer.launch();to this:
const browser = await puppeteer.launch({headless: false});And then run again with Node:
node test.jsPretty cool huh? When we run with {headless: false} you can actually watch Google Chrome work as it navigates through your code.
We’re going to do one last thing with this code before moving on. Remember how our screenshot was a little off center? Well that’s because our page was a little small. We can change the size of our page by adding in this line of code:
await page.setViewport({width: 1000, height: 500})Which results in this much nicer looking screenshot:
Here’s what our final code for this example looks like:
const puppeteer = require('puppeteer');

async function getPic() {
  const browser = await puppeteer.launch({headless: false});
  const page = await browser.newPage();
  await page.goto('https://google.com');
  await page.setViewport({width: 1000, height: 500})
  await page.screenshot({path: 'google.png'});

  await browser.close();
}

getPic();
Example #2 — Lets Scrape some Data
Now that you know the basics of how Headless Chrome and Puppeteer Work, lets look at a more complex example where we actually get to scrape some data.
First, take a look at the API documentation for Puppeteer Here. As you’ll see, there’s a TON of different methods we can use to not only click around on a website, but also to fill out forms, type things, and read data.
In this tutorial we’re going to scrape Books To Scrape, which is a fake bookstore specifically setup to help people practice scraping.
In the same directory create a file named scrape.js and insert the following boilerplate code:
const puppeteer = require('puppeteer');

let scrape = async () => {
  // Actual Scraping goes Here...

  // Return a value
};

scrape().then((value) => {
    console.log(value); // Success!
});
Ideally the above code makes sense to you after going through the first example. If not, that’s ok!
All we’re doing above is requiring the previously installed puppeteer dependency. Then we have our scrape() function where we will input our scraping code. This function will return a value. Finally, we invoke our scrape function and handle the returned value (log it to the console).
We can test the above code by adding in a line of code to the scrape function. Try this out:
let scrape = async () => {
  return 'test';
};
Now run node scrape.js in the console. You should get test returned! Perfect, our returned value is being logged to the console. Now we can get started filling out our scrape function.
Step 1: Setup
First thing we need to do is create an instance of our browser, open up a new page, and navigate to a URL. Here’s how we do that:
let scrape = async () => {
  const browser = await puppeteer.launch({headless: false});
  const page = await browser.newPage();
  await page.goto('http://books.toscrape.com/');
  await page.waitFor(1000);  // Scrape  browser.close();
  return result;
};
Awesome! Lets break it down line by line:
First, we create our browser and set headless mode to false. This allows us to watch exactly what is going on:
const browser = await puppeteer.launch({headless: false});Then, we create a new page in our browser:
const page = await browser.newPage();Next, we go to the books.toscrape.com URL:
await page.goto('http://books.toscrape.com/');Optionally, I’ve added in a delay of 1000 milliseconds. While normally not necessary, this will ensure everything on the page loads:
await page.waitFor(1000);Finally, after everything is done, we’ll close the browser and return our result.
browser.close();
return result;
Setup is complete. Now, lets scrape!
Step 2: Scraping
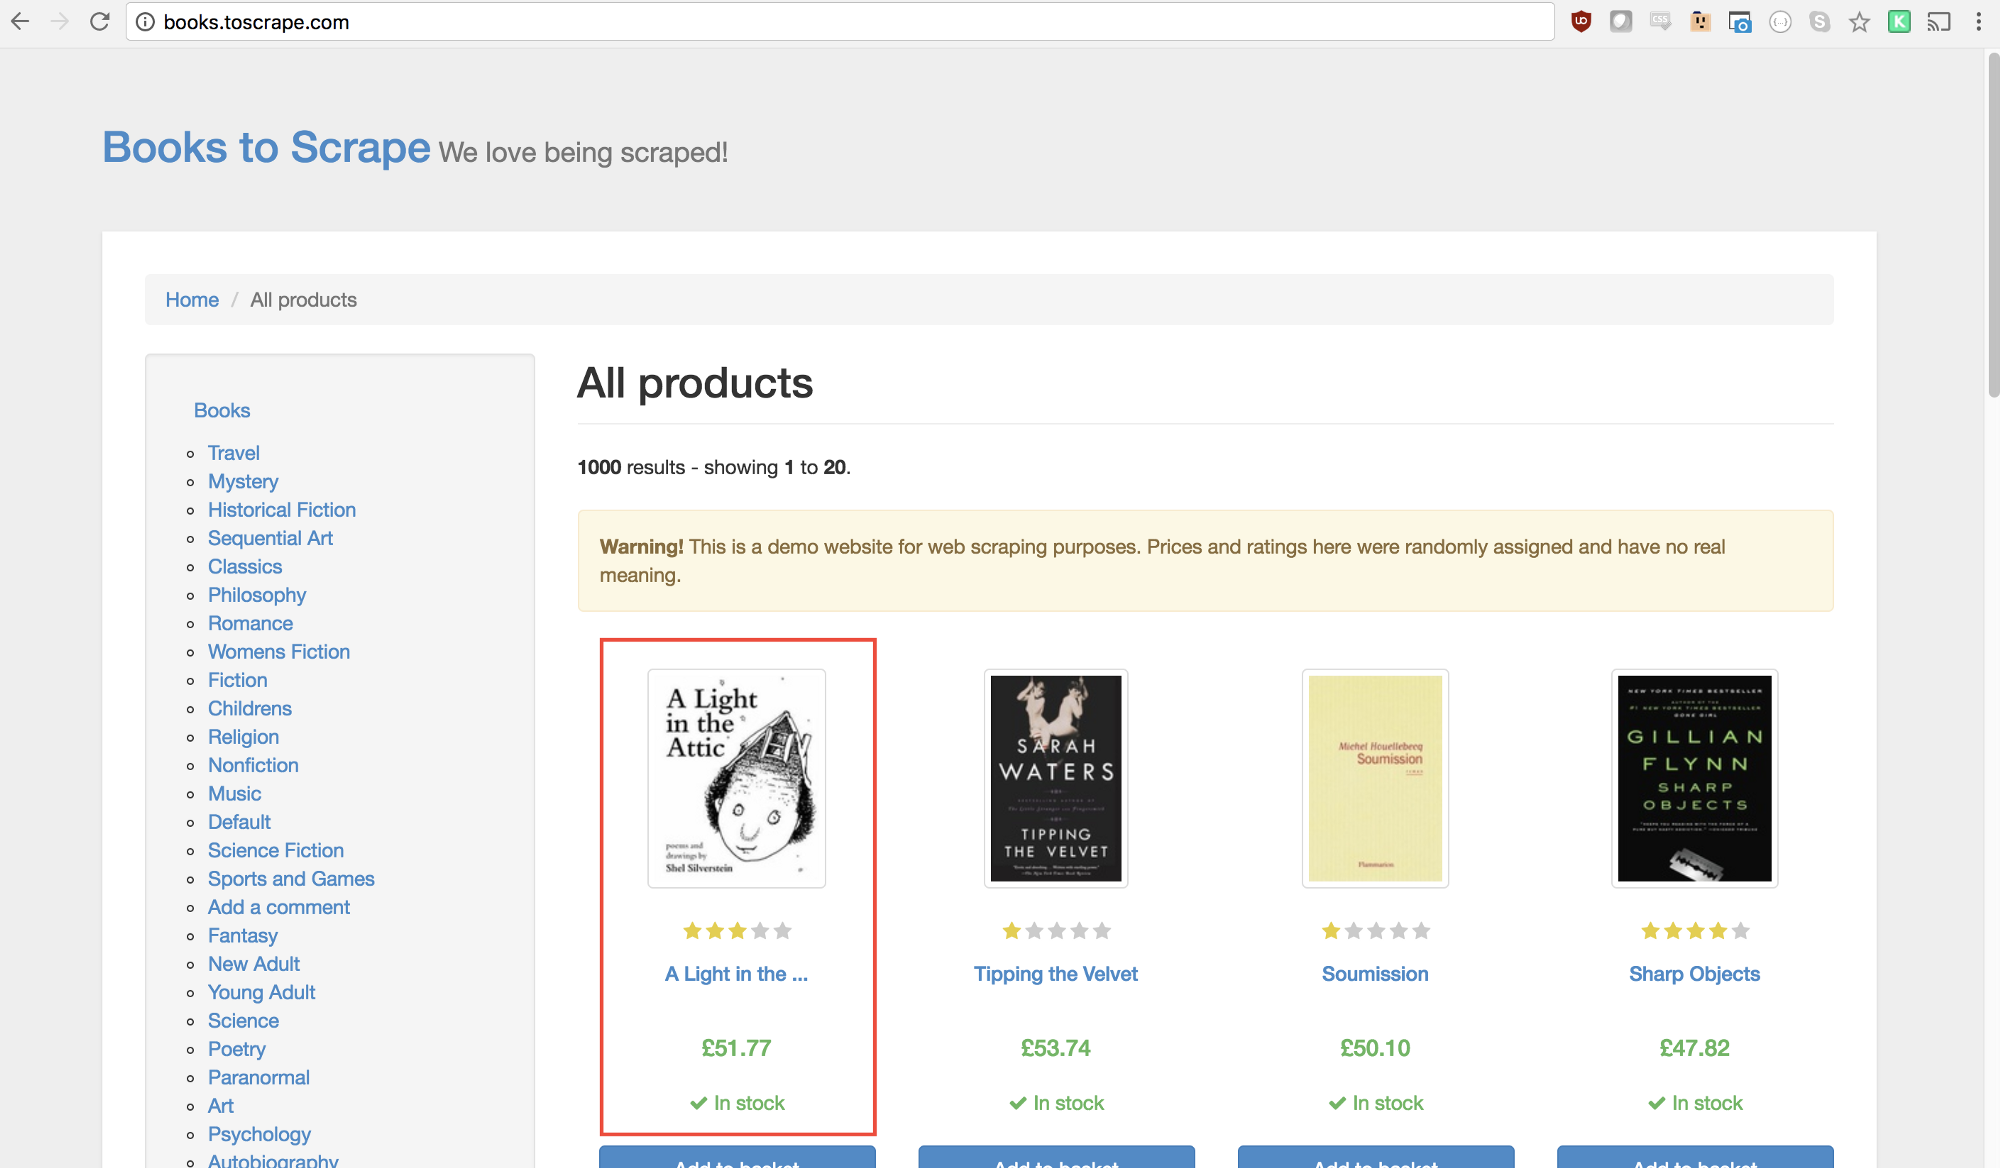
As you’ve probably ascertained by now, Books to Scrape has a big library of real books and fake data on those books. What we’re going to do is select the first book on the page and return the title and price of that book. Here’s the homepage of Books to Scrape. I’m interested in clicking on the first book (outlined in red below)
Looking at the Puppeteer API we can find the method that allows us to click on a page:
page.click(selector[, options])
-
selector<string> A selector to search for element to click. If there are multiple elements satisfying the selector, the first will be clicked.
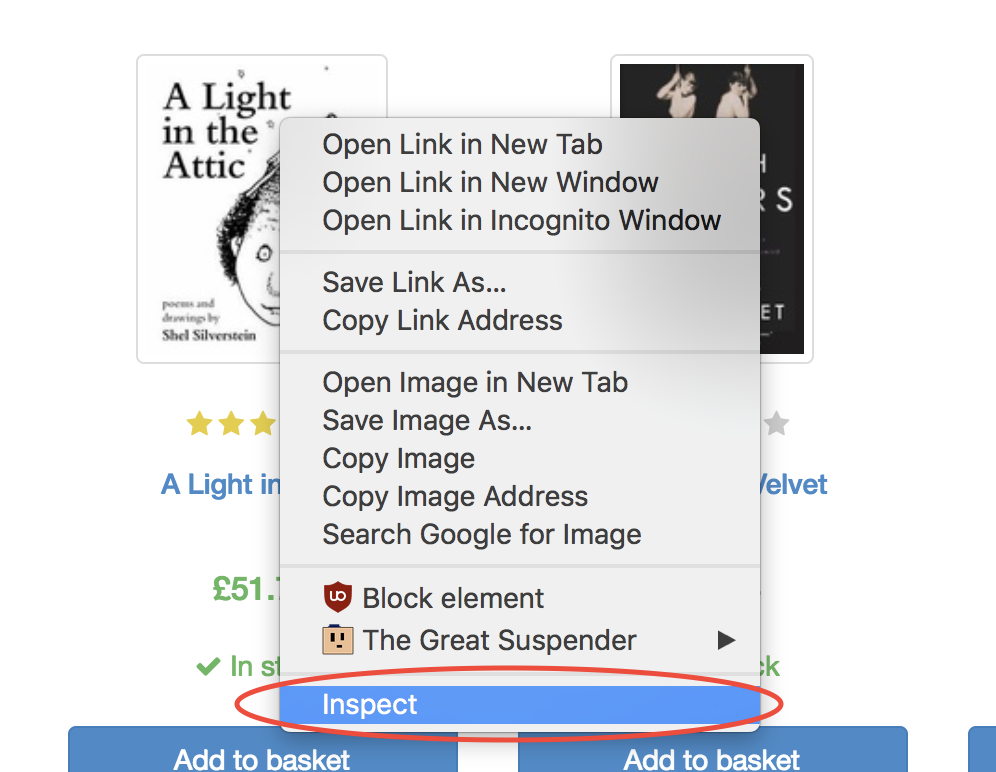
Luckily, the Google Chrome Developer Tools make it very easy to determine the selector for a particular element. Simply right click on the image and select inspect:
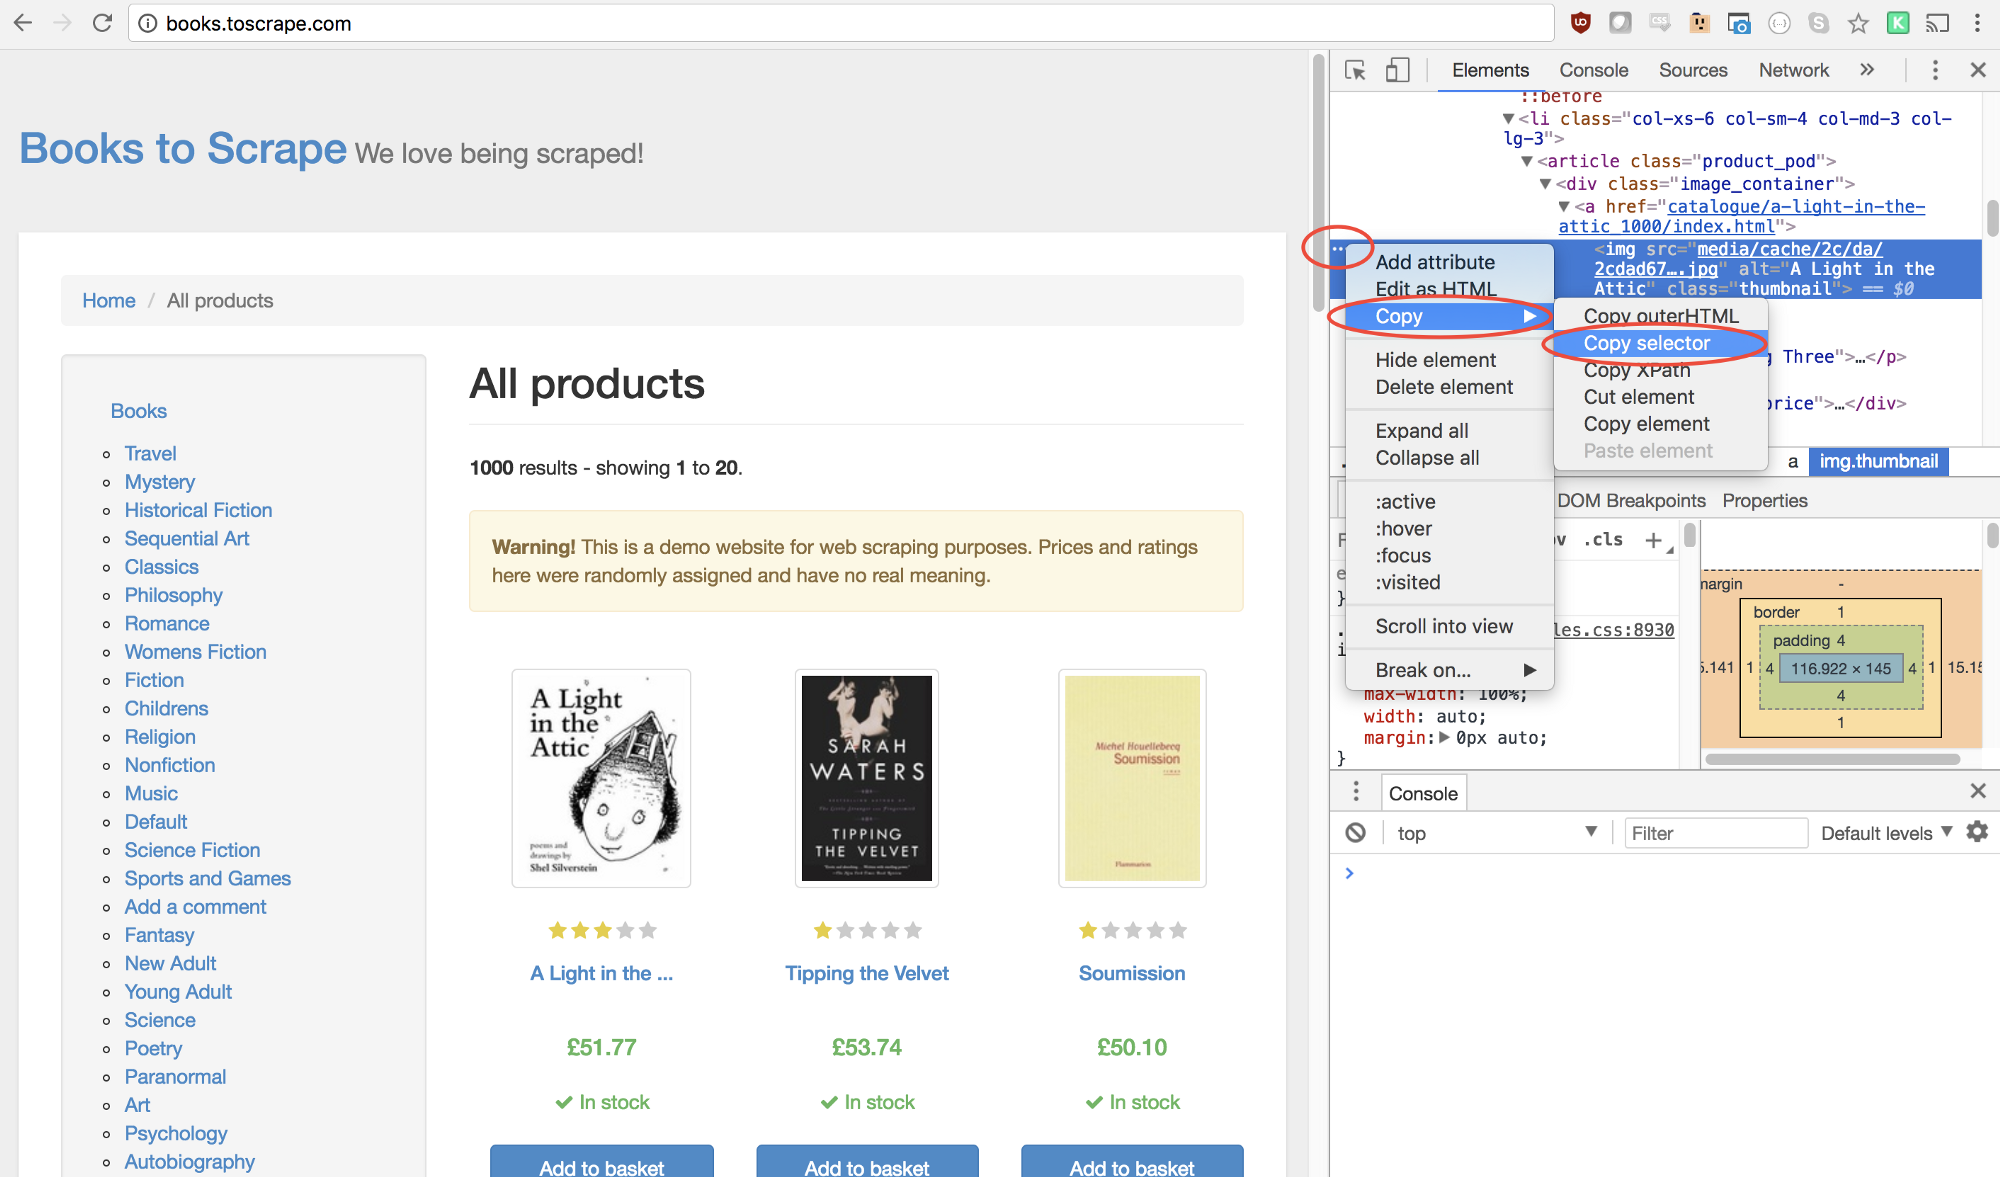
This will open up the Elements Panel with the element highlighted. You can now click on the three dots on the left hand side, select copy, then select copy selector:
Awesome! We now have our selector copied and we can insert our click method into our program. Here’s what that looks like:
await page.click('#default > div > div > div > div > section > div:nth-child(2) > ol > li:nth-child(1) > article > div.image_container > a > img');Our window will now click on the first product image and navigate to that product page!
On the new page, we’re interested in both the product title and product price — outlined below in red
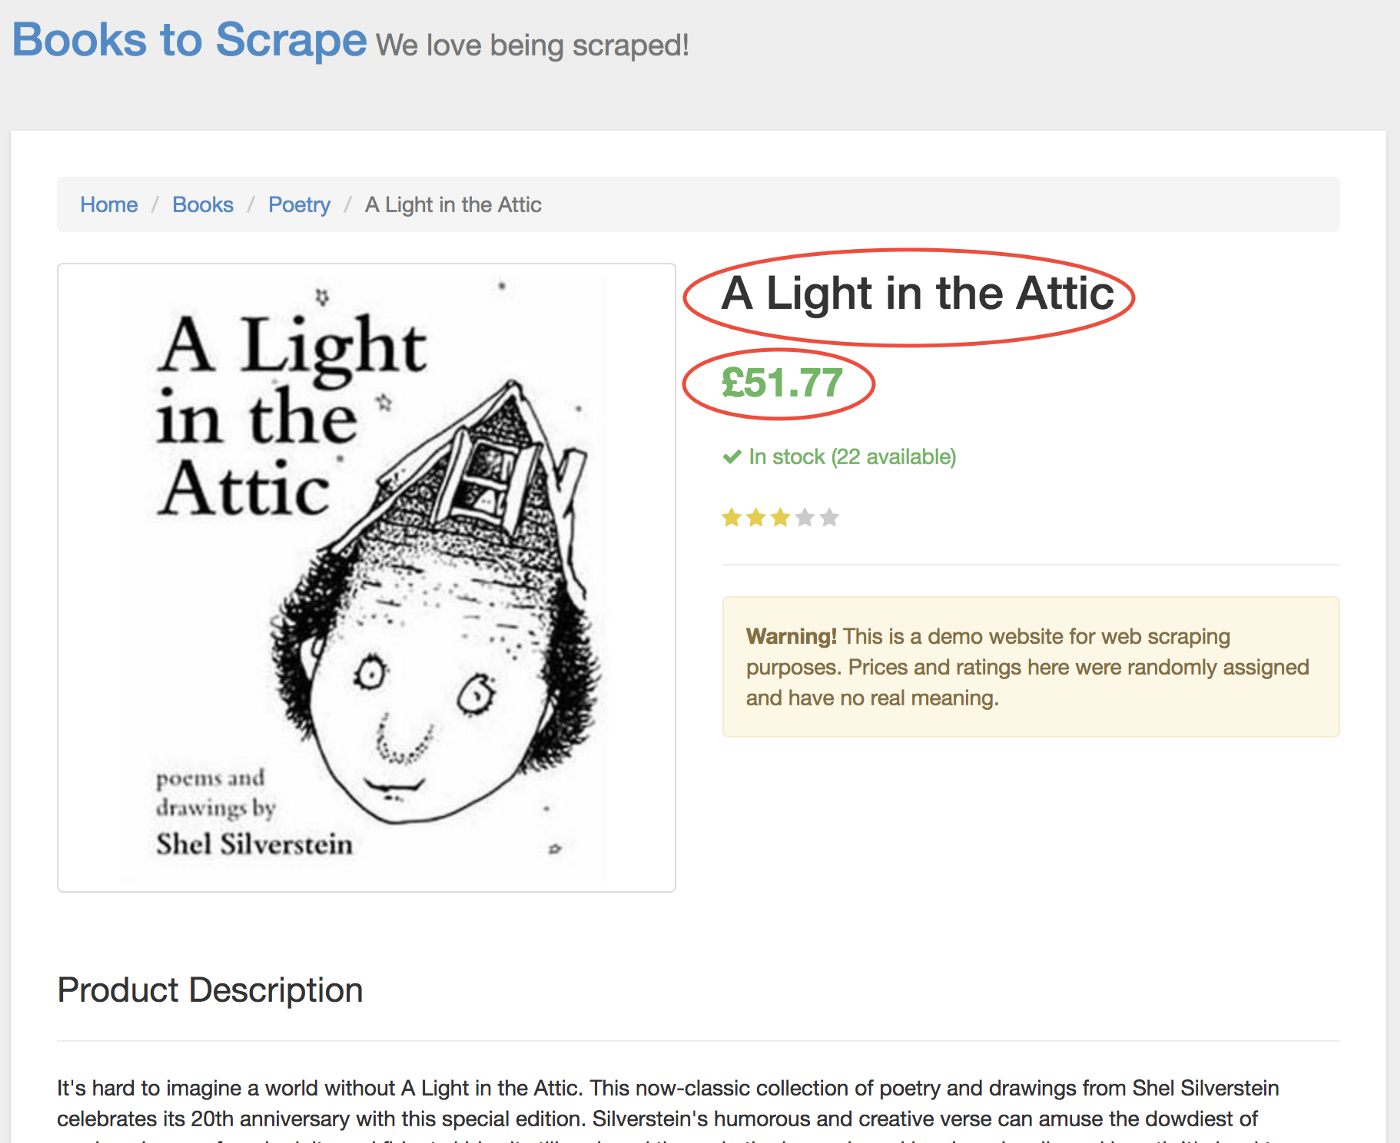
In order to retrieve these values, we’ll use the page.evaluate() method. This method allows us to use built in DOM selectors like querySelector().
First thing we’ll do is create our page.evaluate() function and save the returned value to a variable named result:
const result = await page.evaluate(() => {
// return something
});
Within our function we can select the elements we desire. We’ll use the Google Developer Tools to figure this out again. Right click on title and select inspect:
As you’ll see in the elements panel, the title is simply an h1 element. We can now select this element with the following code:
let title = document.querySelector('h1');Since we want the text contained within this element, we need to add in .innerText — Here’s what the final code looks like:
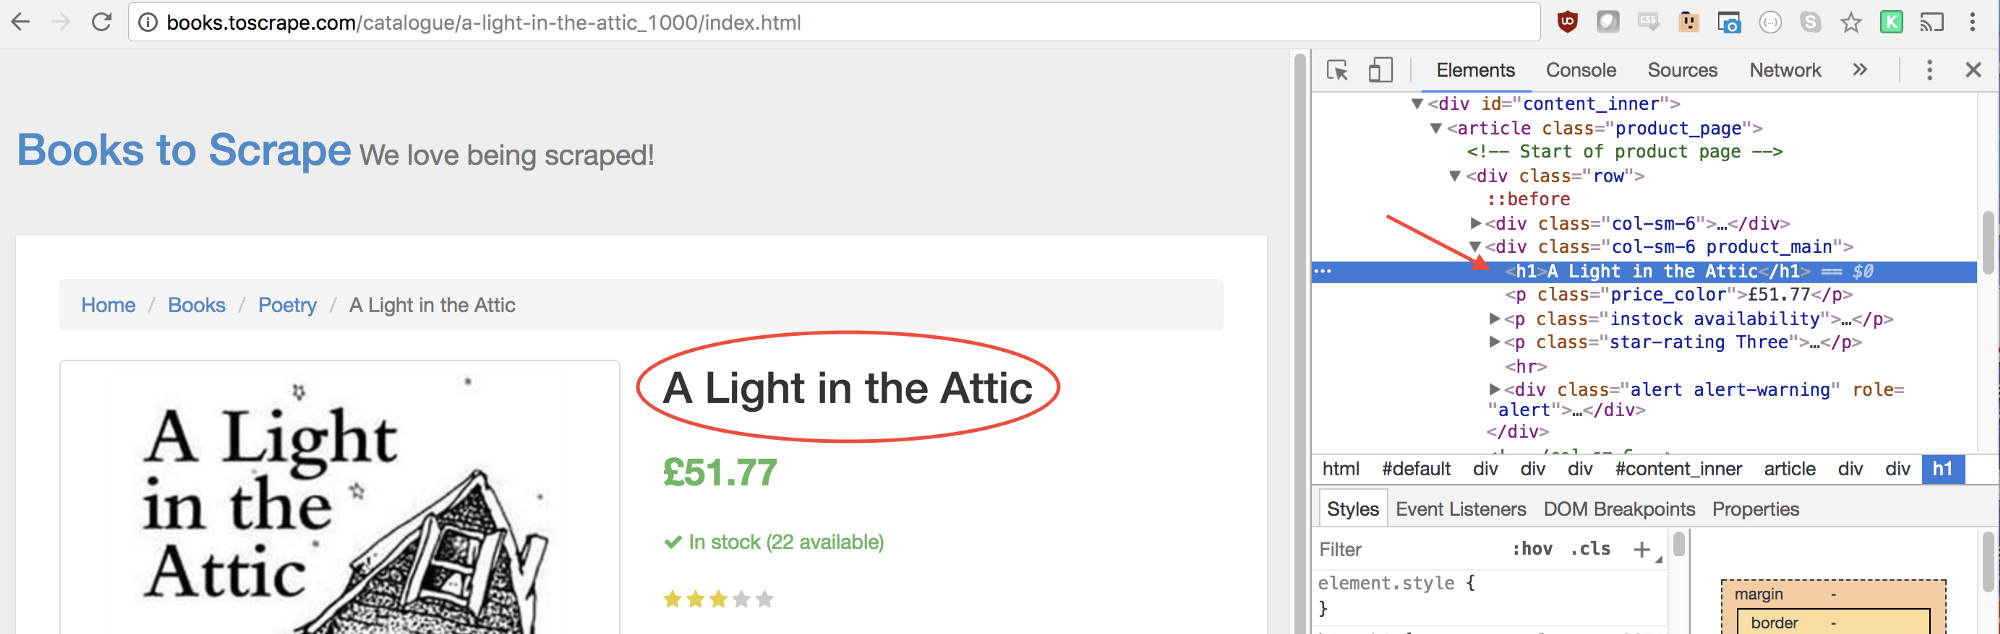
let title = document.querySelector('h1').innerText;Similarly, we can select the price by right clicking and inspecting the element:
As you can see, our price has a class of price_color. We can use this class to select the element and its inner text. Here’s the code:
let price = document.querySelector('.price_color').innerText;Now that we have the text that we need, we can return it in an object:
return {
  title,
  price
}
Awesome! We’re now selecting the title and price, saving them to an object, and returning the value of that object to the result variable. Here’s what it looks like when it’s all put together:
const result = await page.evaluate(() => {
  let title = document.querySelector('h1').innerText;
  let price = document.querySelector('.price_color').innerText;

  return {
    title,
    price
}});
The only thing left to do is return our result so it can be logged to the console:
return result;Here’s what your final code should look like:
const puppeteer = require('puppeteer');

let scrape = async () => {
    const browser = await puppeteer.launch({headless: false});
    const page = await browser.newPage();

    await page.goto('http://books.toscrape.com/');
    await page.click('#default > div > div > div > div > section > div:nth-child(2) > ol > li:nth-child(1) > article > div.image_container > a > img');
    await page.waitFor(1000);

    const result = await page.evaluate(() => {
        let title = document.querySelector('h1').innerText;
        let price = document.querySelector('.price_color').innerText;

        return {
            title,
            price
        }

    });

    browser.close();
    return result;
};

scrape().then((value) => {
    console.log(value); // Success!
});
You can now run your Node file by typing the following into the console:
node scrape.js

// { title: 'A Light in the Attic', price: '£51.77' }
You should see the title and price of the selected book returned to the screen! You’ve just scraped the web!
Example #3— Perfecting it
Now you may be asking yourself, why did we click on the book when both the title and price were displayed on the homepage? Why not scrape them from there? And while we’re at it, why not scrape all the books titles and prices?
Because there are many ways to scrape a website! (Plus, if we stayed on the homepage, our titles would have been truncated). However, this provides the perfect opportunity for you to practice your new scraping skills!
Challenge
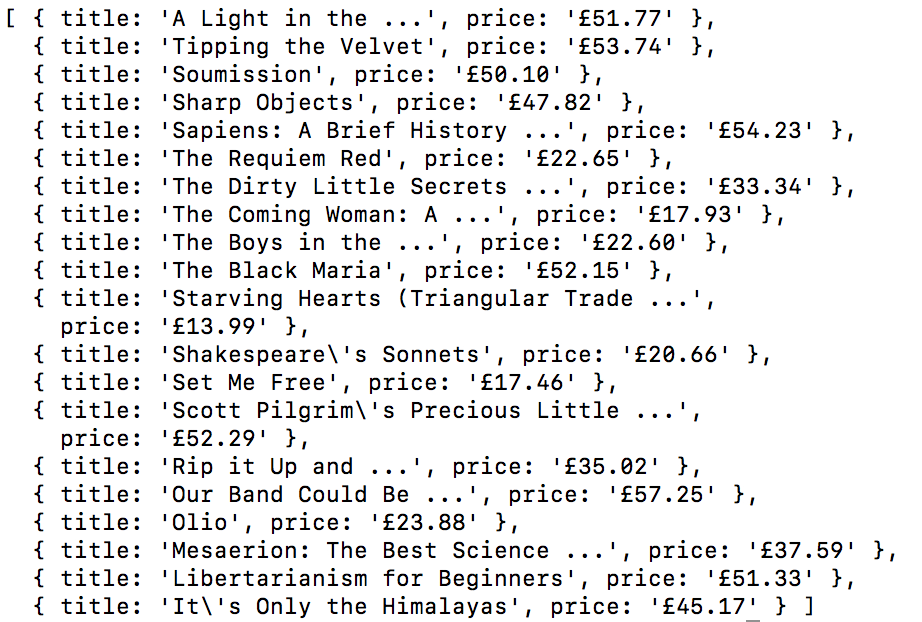
The Goal — to scrape all of the book titles and prices from the homepage, and return them in an array. Here’s what my final output looks like:
GO! See if you can accomplish this on your own. It’s very similar to the above program we just created. Scroll down if you get stuck…
...
Hint:
The main difference between this challenge and the previous example is the need to loop through a bunch of results. Here’s how you might set up your code to do this:
const result = await page.evaluate(() => {
    let data = []; // Create an empty array
    let elements = document.querySelectorAll('xxx'); // Select all

    // Loop through each proudct
    // Select the title
    // Select the price
    data.push({title, price}); // Push the data to our array

    return data; // Return our data array
});
...
If you couldn’t figure it out, that’s OK! This was a tricky one… Here’s one possible solution. In a future article, I’ll dive more into this code and how it works. We’ll also look at more advanced scraping techniques. Be sure to enter your email here if you’d like to be notified.
Solution:
const puppeteer = require('puppeteer');

let scrape = async () => {
    const browser = await puppeteer.launch({headless: false});
    const page = await browser.newPage();

    await page.goto('http://books.toscrape.com/');

    const result = await page.evaluate(() => {
        let data = []; // Create an empty array that will store our data
        let elements = document.querySelectorAll('.product_pod'); // Select all Products

        for (var element of elements){ // Loop through each proudct
            let title = element.childNodes[5].innerText; // Select the title
            let price = element.childNodes[7].children[0].innerText; // Select the price

            data.push({title, price}); // Push an object with the data onto our array
        }

        return data; // Return our data array
    });

    browser.close();
    return result; // Return the data
};

scrape().then((value) => {
    console.log(value); // Success!
});
Original article :
A Guide to Automating & Scraping the Web with JavaScript (Chrome + Puppeteer + Node JS)